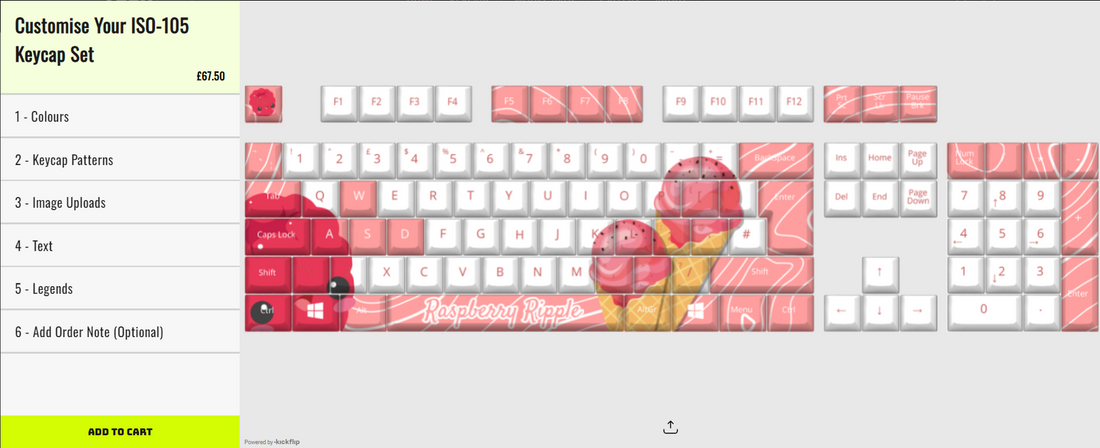
Creating Your Own Custom Keycaps: A Step-by-Step Guide to Using Our Design Tool
Our keycap editing tool makes it easy for you to add your own unique design to your set-up. whether you're looking to add a splash of colour, patterns, or an image of your choice, this tutorial will guide you through each feature, step-by-step. Lets get started!
Just a note before we start. This editor is optomised best for desktop. Especially with larger layouts. If possible, please use on a computer.
1. Colour: Choose your keycap colour
The first step in designing your custom keycaps is selecting the colour of your keycap.
- Select the 'colours' tab on the left hand side.
- Choose whether you would like to colour the keyboard as a whole (whole set), or by each individual section (section)

- Scroll down to reveal the appropriate colour wheels for your choice.
- The colour can be selected by eye or can be determined by a hex code which can be inputted above the colour selection. To select previously chosen colours, click on the 'swatches' tab on the colour picker

2. Patterns: Add texture to your design
Patterns can add depth and complexity to your keycap design. Our customiser offeres a range of preset patterns like gradients, floral and many more including our favorite, topology.
- Navigate to the 'Keycap Patterns' tab
- The Thumbnails show all the different available patterns. Clicking these will apply the pattern to the whole set. The colour wheel underneath them will change the colour for the whole set pattern.

- If you would like the patterns to apply only on certain sections, navigate to the section you would like, choose the desired pattern from the drop-down box and then use the colour wheel below to choose the colour.

- Remember to use swatches if you would like to select a colour already used in the design.
- Multiple patterns can be applied to each section to create unique combinations.
3. Custom Image Uploads: Make it Personal
Uploading an image is a perfect way to showcase your art, favorite photos or logo.
- Click on the 'Image Uploads' tab.
- There are 16 image uploads available in this tab.
- to upload an image, simply browse your device or drag and drop into the box.

- Supported formats are PNG, JPG, JPEG, AI, EPS, PDF and HEIC.
- After your image is uploaded (this may take up to 10 seconds, depending on the size of your image), you can drag it and adjust it using the scale button on the bottom of the image.

- Images are layered based on the numbers on the left hand side.
4. Add Text
Adding Text is a great way to personalise your keycaps with a name, message or symbols.
- Click on the 'Text' Tab
- You can choose to add space bar text or whole set text or both.
- When selecting the space bar, you will be prompted with 4 questions, allowing you to choose your text, font, colour and outline. The Space bar text is clipped so it can only be applied to the space bar area.

- When keycap text is selected, you will be promted to choose how many text objects you would like to add with a maximum of 4. After this is selected, you will get the same 4 promts for text, font, colour and outline.

- All text can be manipulated in the same way as images, allowing you to move, scale and rotate.


5. Legends: Tailor to you
Legends can be a way to tailor your keycaps to you, allowing you do change the layout or sublegends.
- Click on the 'Legends' tab
- Legend Type: Select your Legend Layout. Default is QWERTY. If you would like an alternative layout, select Other and type in the desired legend in the text box. (This will not appear in the editor but we will change in our post process.)
- OS Button: Choose the type of OS button from the dropdown box. Use the colour picker below to alter the colour of your OS button.


- Legend colour, position and font: Legends can be coloured like the keycaps were, by whole set or sections. Select which you wold like.

- Below this question, select the legend position from the dropdown box, the colour from the colour wheels and font. Default font is open sans, to choose another, click other and specify in the text box. (This will not appear in the editor but we will change in our post process)

- Sub-Legend: Alternative sublegends are available. choose from the dropdown box named sub legend. If your desired sub legend is not there, click other and specify.
- Change the colour of your sublegend using the colour wheel.

6. Order Notes: Finishing touches
The order notes are optional but if you feel like there isnt something quite right with your design, or you would like the change the colour, size etc of something in the design when it is not possible to do so in the editor, tell us in the order note and we can do it in the post process.

We review all designs and create custom print files based on your design so feel free to add remarks in this section.
Complete your Order
After these steps are completed and you're happy with your design, click 'Add to Basket'. This will save your design and take you to the order page where you can place your order.

Tips for a great design
- Use Contast: Make sure your text contast well against your keycap or pattern colour to make sure every letter is legible and visually appealing.
- Keep it simple: Sometimes less is more. Avoid overcrowding your design with too many elements.
- Save your design: if you would like to save your design and come back to it another time, click the share button and copy the link. save this somewhere and next time you click it, you'll be taken to right where you left off.
Ready to Get Started?
With these steps, you will be ready to design your own custom keycap masterpiece. Head to our keycap product page to start creating. We can wait to see what you come up with!
If you need inspiration or help getting started, check out our design templates page where you will find some of the designs we have created using the editor.
Feel free to also contact our support team at contact@techtoppers.co.uk
Happy Designing!